I love collecting vintage items and antiques... but since I live in NYC, I have very little space to keep them. With that in mind, I try to repurpose my found treasures whenever possible, which is how I came up with this Vintage Pan Memo Board.
Here is the awesome pan that instigated the whole project: it's this great, enamelware pan with a blue rim... so pretty!
This project was insanely easy, thanks to 3M's Command Strips.
I used 4 pairs of heavy-duty strips and applied them to the back of the pan.
Following the directions on the package, I applied my pan to the wall, where it has been every since! I decided to put the pan just next to my front door where, thanks to come magnets, I can hang my keys, a flashlight, and other important things I might need. So there you have it- a very easy way to transform a pan into a memo board!
With Christmas just around the corner, I've been stealing moments here and there to get my house and office decorated for the holiday! With that in mind, the other day I whipped up a few Doorknob Jingle Bells. I've always loved the phrase "every time a bell rings an angel gets his wings" from It's a Wonderful Life, and by including bells on doorknobs (which are constantly opening and shutting everyday), I can ensure that a whole heavenly choir earns their wings on a daily basis!
My supplies for this project were really simple: just some red yarn I had in my stash and a handful of jingle bells.
As usual, I didn't use a pattern for this project, so bear with me as I try to describe what I did! I started with a chain of 9, then I single crocheted 3 more rows of 8 stitches.
Then it was time to add my bells! I wanted my bells to be in the middle of my circle so they'd jingle around the edge of my eventual project, so I decided to attach them on the fifth stitch of the row. So I inserted my hook into the project, but before I grabbed the yarn to continue the stitch, I slipped a bell onto the loop of yarn. Then I pretend like the bell wasn't there and just continued the stitch and finished the row.
I did that same thing 9-10 times, until I had a little swath of crochet with a row of bells.
Next, I folded the project in half (so the bells were on the outisde), and using a single crochet stitch I fastened the sides of my swath together.
When that was finished, using a long piece of yarn I quickly sewed the two remaining ends together to create a circle.
And that was all it took to make a Doorknob Jingle Bell. This took about 30-40 minutes to make, so I was able to knock out a couple while catching up on TV the other night!
DOORKNOB JINGLE BELL SUPPLY LIST
Yarn
Jingle bells
Scissors
Crochet hook
In our family it is a tradition to have baskets of nuts available for guests to enjoy. Truth be told, I never really liked eating the nuts, but cracking them was a whole other story! Lucky for me, I had a very loving grandfather who would eat whatever nuts I would crack open, so I have fond memories that involve mixed nuts and the holidays.
Nowadays, while I don't like to eat the nuts, I still like to incorporate them into my holiday decorations! So the other day, I whipped up this Nut Garland.
The whole project was really simple! I started with a bunch of nuts I picked up at my local grocery. These particular nuts (walnuts, almonds and filberts) are sold by the pound, so they're pretty inexpensive!
Then I grabbed my drill, a cheap cutting board* I got at the Dollar Store, and I got to work. This probably wasn't the safest way to do it, but I held a nut in one hand, and using the drill in my other hand, drilled a hole through each nut. I used the drill on top of the cheap-o cutting board since I didn't want to drill too far and gouge my counter top.
*Most people would probably have a piece of scrap wood in the garage they could use instead, but since I live in a tiny NYC apartment and don't have a stash of scrap wood lying around, I ruined a very inexpensive cutting board!
After a lot of drilling, a few split nuts, and a couple thumb scrapes (thanks to a slip of the drill), all of my nuts were hole-y!
So I grabbed a tapestry needle, some brown embroidery floss, and strung the nuts!
See? I must admit, when I first envisioned this project I had planned to string the nuts and then lay them amongst the candles on the table in a wintry centerpiece: I thought the winding line of nuts would look really cool and would be way easier to deal with than a bowl full of loose nuts piled all over the place. However, once the nuts were on the string I became a little obsessed with hanging the nuts somewhere!
So I decided to leave a few inches of floss at each end of the garland and I tied a simple loop in each end since I thought it might make it easier to hang/use in the future.
This garland can be used for anything, really! Ultimately, I'm going to try winding mine around a mini Christmas tree. However, like any good crafter, I finished my garland before I managed to purchase said Christmas tree, so for the moment the nuts are hanging from some sconces to keep them untangled. Don't worry, this is only a temporary solution... I think...
All in all, I'm pleased to say that this is a really simple and inexpensive project that adds a bit of family tradition to my holiday in a new way- I can't wait to add them to my tree!
NUT GARLAND SUPPLY LIST
Nuts
Drill
Drill bit
Needle
Embroidery floss
Scissors
Now that Christmas is just a few weeks away, I can officially start getting ready for the holiday! I spent the weekend tackling little projects that I've been looking forward to, including these Cinnamon Gift Tags and Ornaments. I'm sure you've seen these before - they're like cinnamon cookies that you don't eat, but they last forever and smell delicious!
1. Admittedly, I hadn't made these cinnamon ornaments/tags before, so after some Internet research I found a recipe that seemed ideal: cinnamon (of course), ground cloves, ground nutmeg, applesauce (really?!) and glue (I don't have white glue lying around, I I substituted with some modge podge). If you want the exact recipe, I've included it below!
2. According to the recipe, I measured all the ingredients and poured them into an old bowl. I was a little nervous that the project woudn't clean up well, so I used old utensils, etc.... but I was pleased to learn that everything cleaned up without an issue- what a relief!
3. After a bit of mixing (I found it was easier to just use my hands), the dough came together.
4. So I sprinkled some cinnamon on my counter top, and prepared to roll out the dough with a rolling pin.
Once the dough was an even thickness, I cut out my ornament and tags using a cookie cutter. I wanted some of my holiday gifts/decorations this year to represent my Swedish heritage, so I used a Dala Horse cookie cutter.
And in order to make the holes for my ornaments/tags, I used a plain, ol' drinking straw to punch holes in the dough.
In no time at all, I had cut all the dough and put it on cookie sheets lined with foil. Then I placed the pans in a warm oven for several hours to dry out.
Once they were dry (and my apartment smelled amazing), I couldn't wait to see how my tags/ornaments had turned out.
I grabbed some ribbon to hang the ornaments...
And threaded some ribbon through the tags to decorate some holiday packages.
This was a really fun and easy project that I hope will become an annual tradition! And since all of the ingredients were so inexpensive, I can certainly afford to make a few more batches... maybe even this year!
Non-Edible Cinnamon Ornament/Tag Recipe
-1 cup cinnamon
-1 tablespoon ground cloves
-1 tablespoon ground nutmeg
-3/4 cup applesauce
-2 tablespoons glue (or in my case, modge podge)
CINNAMON GIFT TAGS AND ORNAMENTS SUPPLY LIST
Non-Edible Cinnamon dough (see above for recipe)
Rolling pin
Cookie cutter
Cookie sheet
Oven (optional)
Scissors
Ribbon
I always have a handful of projects in-process at any given time. And one of my favorite, year-round projects are Crocheted Hats for Good Causes.
Did you know that there are tons of organizations that are in need of homemade hats? If you do a quick Google search, you'll find all sorts of people who are organizing hats for cancer patients, homeless people, veterans, and more. With that in mind, throughout the year I crochet hats of different sizes and colors, and then every few months I pack them up and send them to a new charity.
I have lots of fun making these hats, so I usually have lots of different hats "in progress," as you can see!
Now, I have to admit, I am still a novice crochet-er, so I am pretty terrible at reading instructions. But I didn't let that stop me from creating this very basic hat design. I actually make all of my Crocheted Hats for Good Causes using this simple pattern that I came up with. I try to use soft yarn and a smaller hook so my stitches will be tight- this makes for a very warm hat, which I suspect the eventual recipients appreciate!
1. I start by crocheting a circle. There are lots of tutorials online, but basically I single crochet 6 and join the stitches to create a ring. Then I make two single crochet stitches in each of the initial stitches around the ring, so I have 12 stitches around.
2. For the next round, I make two single stitches into the first stitch, and then one single stitch into the second. I do this for the entire round, so I have 18 stitches around. For the fourth ring I stitch two single stitches into the first stitch and single stitches into the next two stitches, so I have 24 stitches around... are you getting the picture?
3. As I continue increasing each round, the circle grows...
4. And grows...
5. And the circle grows until it is as big as I want the top of my hat to be. Once I think the circle is big enough to cover the head I have in mind, I stop increasing my rounds. But not increasing, the circle stops growing and starts growing up!
6. Of course, I love a little color, so I sometimes switch yarn colors for a few rows which adds a band of color to the hat.
And after lots of crocheted rounds, my hat is finally finished!
Since I'm not sure who will end up receiving my hats, I try to make them versatile by crocheting them extra long so people can fold over the bottom if they choose!
There you have it - a very simple way to crochet Hats for Good Causes. If you have some extra yarn lying around, this is a great way to help out those in need! Now, I'm off to the post office because I have a box of hats on their way to new owners!
CROCHETED HATS FOR GOOD CAUSES SUPPLY LIST
Yarn (soft and washable if possible)
Crochet hook
Scissors
I love apples! I have very fond memories of traipsing through the apple orchard in my hometown on brisk, fall mornings, my boots damp with dew as I munched on a cold apple I'd snagged from a low hanging branch. I tell you, nothing tastes as good as an apple picked right from the tree- heavenly!
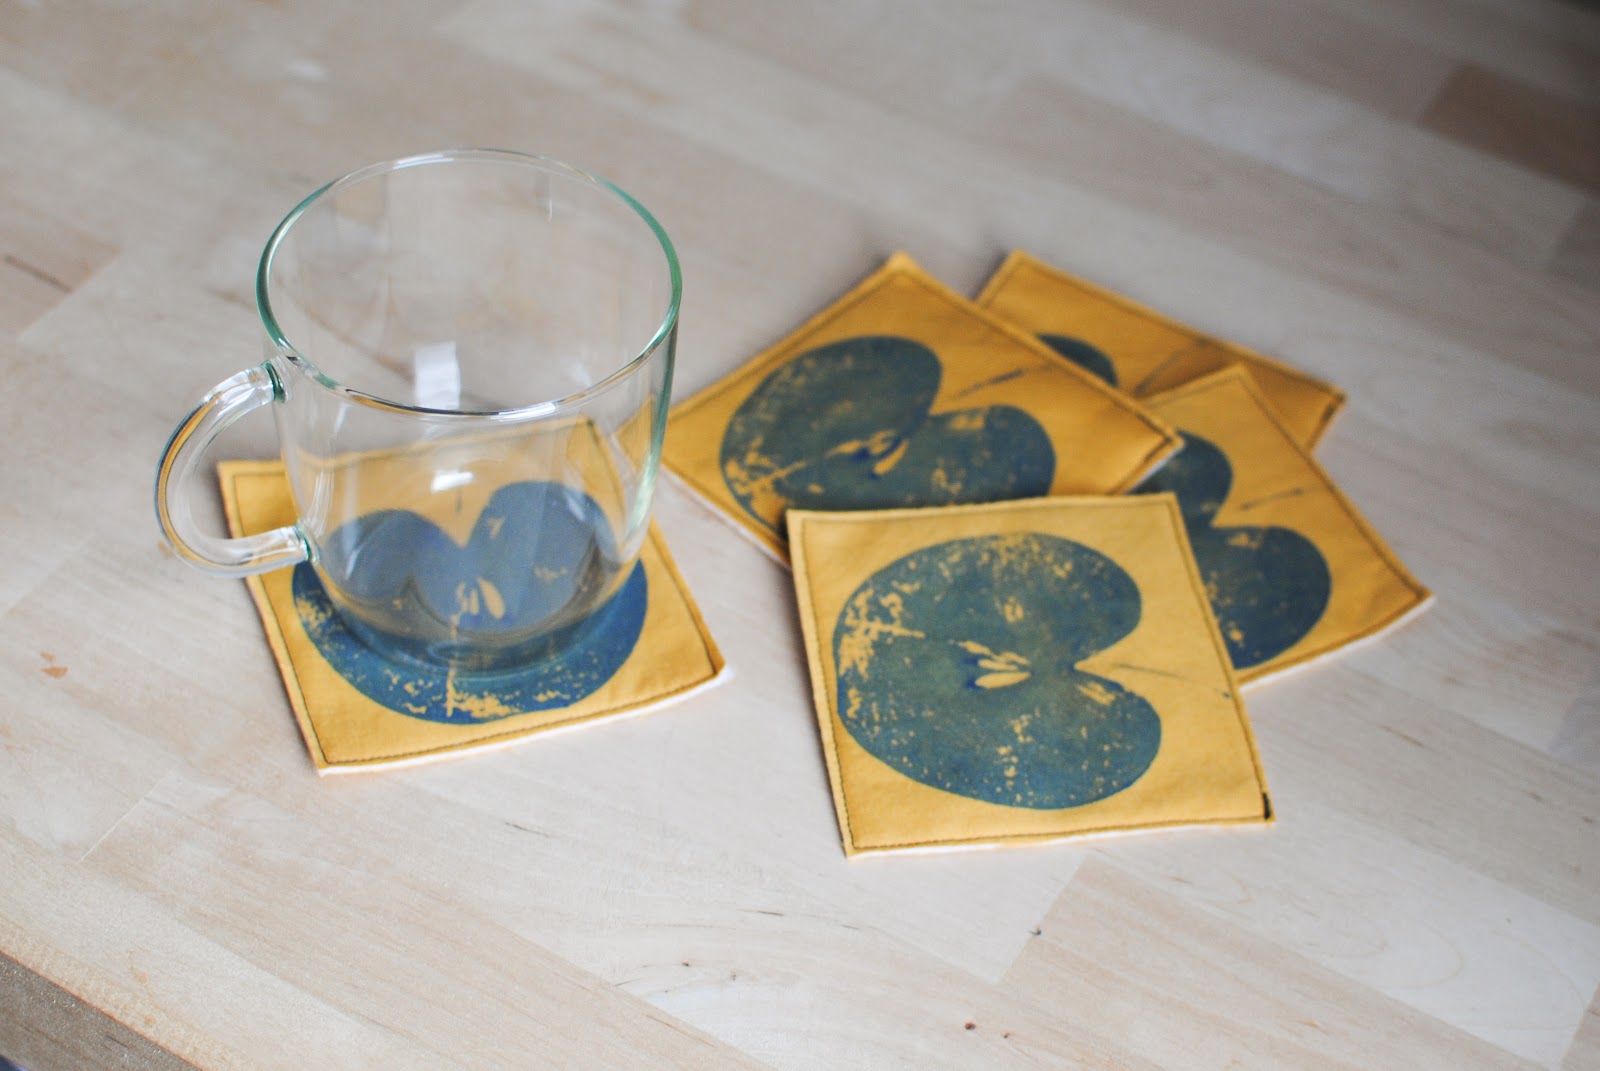
Well, the other day I spotted some apple prints online and wanted desperately to incorporate something similar into my life! And that's how I came up with these Apple Print Coasters.
1. I started with the usual cast of characters: acrylic paint, fabric with coordinating thread, iron-able batting, and an apple (please ignore that bias tape - it didn't end up being used in my project!).
2. Using a rotary blade since I'm not the straightest cutter when using scissors, I sliced my fabric into 4 inch squares. Once the fabric was prepared, I sliced an apple and prepped my paint.
3. And then it was time to print! My apple was especially juicy, so before I lathering paint on the apple using a foam brush, I wiped it with a paper towel to remove the excess apple juice.
4. Next up: stamping! I didn't want my prints to be completely perfect, so I only reapplied paint between every 2 stamps. I was also careful to also paint the stem of my apple, which I think makes the prints even easier to distinguish. After I had finished stamping, I left my prints to dry for a couple of hours.
5. Once the prints were dry, it was time to assemble! I ironed the batting between two pieces of 4 inch fabric (one of which had been printed upon), and kept things together with a couple of straight pins.
6. Once everything was ironed, I turned to my trusty sewing machine.
7. I ran a simple stitch around the perimeter of the coaster and I ended up using a contrasting thread to make things really "pop."
8. Then I quickly cut the edges off each of the coasters, leaving a but of fabric around my sewn edges... and I was finished!
As I found out, 4 inches seemed to be the perfect size for most of my glasses/mugs as well as the perfect size for my stamping apple!
Of course, I couldn't stamp in a single color, so I added a few red and green apples to my coaster stash.
These little coaster were SO easy to whip up, I made some extras that I packaged up with a little baker's twine. I think a stack of coasters, along with a box of tea or a pretty new mug, will make great "get well soon" gifts this winter when my friends and family get a cold!
APPLE PRINT COASTERS SUPPLY LIST
Cotton fabric
Iron-able batting
Thread
Scissors
Paint
Foam paint brush
Apple, cut in half
Iron
Sewing machine
If you've visited this blog before, you're well aware that I like to make craft projects out of objects I have lying around my house. And this project is no different! Here's how I whipped up this Fall Bottle Centerpiece.
I started with four, brown glass bottles of old beer (you'll notice that none of the beer is seasonally appropriate- go figure, right?).
After a few minutes under hot water, I was able to scrape and peal the labels off the bottles. Then I gathered a few more project materials (acrylic paint and a bundle of twine) and got to work!
I started by painting the word "fall" on the bottles, one letter at a time. Since I didn't need the paint to be permanent, I used plain acrylic paint rather than paint specifically formulated for glass.
Once the paint was dry, I started wrapping the bottles with twine. I anchored the twine with a bead of hot glue and carefully wrapped the twine around the bottles in two sections per bottle (one section on top of the painted letter and one section on the bottom).
And in no time at all, I was finished with the bottles!
When I first came up with this plan, I had hoped to put branches full of colorful leaves in the bottles (I'm sure you've seen similar things all over the blogosphere). However, Hurricane Sandy blew all of the beautiful leaves off the trees in my neighborhood, so that wasn't an option for me.
So I improvised and turned my centerpiece into a candelabra of sorts. I grabbed some shorty candles I got at the dollar store a while ago and plunked them into the bottles
How's that for a seasonal centerpiece?
FALL BOTTLE CENTERPIECE SUPPLY LIST
4 brown bottles
Acrylic paint
Twine
Paint brush
Hot Glue
Candles (optional)